ArcGIS License Manager Settings


This post will cover 3 aspects of ArcGIS License Manager:
- Using ArcGIS Desktop 9.3x and 10.x with License Manager 10.x
- ArcGIS License Manager common firewall issues
- ArcGIS License Manager options for reserving licenses/extensions for specific users/groups
1. Using ArcGIS Desktop 9.3 with License Manager 10.x
If you use the default setup of ArcGIS License Manager 10.x you might notice that 9.x ArcGIS Desktop clients can’t connect by default. This is due to a minor change in how ArcGIS Desktop uses ports when connecting. At 9.x, Desktop will try to contact LM using port 27004, however, LM 10.x is setup to use a port range of 27000-27009 instead.
To fix this issue, open the service.txt file located in the LM install directory (C:\Program Files (x86)\ArcGIS\License10.2\bin). I recommend making a backup first. The first line will typically read SERVER this\_host ANY. Change this line to read SERVER this\_host ANY 27004. This will force LM to use port 27004. Both 9.x and 10.x will be able to connect. Don’t forget to restart LM for the changes to take effect. Test.
2. ArcGIS License Manager common firewall issues
Firewalls are typically your friend. However, they also can’t read minds to understand what ports to keep open or closed. Once your License Manager is setup, the firewall configuration is fairly straight forward if you are having issues connecting from a different machine. ESRI provides these steps to work through the firewall. Below is a quick summary:
Before configuring the firewall, you will want to update the same service.txt file mentioned in part 1. This time, update the line VENDOR ARCGIS to use a specific port, such as VENDOR ARCGIS PORT=1235. This specifies that the vendor daemon (ARCGIS) is to use the port 1235. Don’t use any of the ports in the 27000-27009 range since this is the default range for FlexNet lmgrd. Again, don’t forget to restart LM - or stop LM before updating and start afterwards.
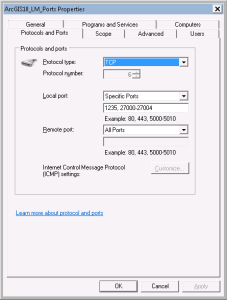
To set the firewall options in Windows Server 2008, open the Windows Firewall with Advanced Security application. On the left panel/tree, click the Inbound Rules. In the Actions area click the New Rule… button. On the General Tab, provide a rule name such as ArcGIS10LMPorts. On the Protocols and Ports Tab set the following:
- Protocol type: TCP
- Local Port: Specific Ports; 1235, 27000-27009
- Remote port: All Ports
The local port settings in this example are set to the full range of lmgrd. If you are also implementing Step 1 (using with Desktop 9.x) you can just set the ports to include 27004. The image here uses a third example, setting the range to 27000-27004. After your ports have been set, save the firewall rule and make sure it is enabled. Test.
3. ArcGIS License Manager options for reserving licenses
There are a few cases where you might want to reserve an ArcInfo (AKA Advanced) license for admin purposes, or possibly an extension license for a small group of users. To accomplish this, another edit is required to the service.txt file to point to an Options file with additional configurations set. In the options file we will create a User Group to contain a list of staff, and specify what license can be reserved by the group. Once complete, this license will not be available to users outside the group. If one user in the group is already using the reserved license, other group users can still grab a general license from the pool. The example steps through reserving 1 ArcInfo license for an admin group):
- Create a new file called ARCGIS.opt (or whatever name you wish to use) in the same directory as the LM service.txt file and open in your favorite text editor.
- In the ARCGIS.opt file, create a group called AdminGroup and specify users:
- Create the group: GROUP AdminGroup
- Add users by OS login (no commas, just spaces to list users): BryanMac AlGore BarnyRubble
- The full line will read: GROUP AdminGroup BryanMac AlGore BarnyRubble
- On a new line, specify the license to reserve one (1) ArcInfo for the AdminGroup
- RESERVE 1 ARC/INFO GROUP AdminGroup
- Save and close the option file. Note: you can also add comment lines to the file using the hash/pound (#) symbol
- Setup LM to use the newly created option file:
- Open/edit the service.txt file
- Update the line reading VENDOR ARCGIS PORT=1235 to point to a options file, in this case called ARCGIS.opt: **VENDOR ARCGIS PORT=1235 options=“C:\Program Files (x86)\ArcGIS\License10.2\bin\ARCGIS.opt” **(don’t forget the quotes)
- Save the service.txt file and restart License manager
- Test
The final results
Here is an example service.txt file if using all of the steps above:
SERVER this_host ANY 27004
VENDOR ARCGIS PORT=1235 options="C:\Program Files (x86)\ArcGIS\License10.2\bin\ARCGIS.opt"
INCREMENT ACT ARCGIS 1 permanent 1 qweryqweryqweryqwery\
vendor_info=qweryqweryqweryqwery
And the final ARCGIS.opt file:
\# Reserve one Info/Advanced license for administration (also added timeout)
\# To return any hung license after 1200 seconds
TIMEOUTALL 1200
\# Setup the User Group
GROUP AdminGroup BryanMac AlGore BarnyRubble
\# Reserve an ArcInfo license for the group
RESERVE 1 ARC/INFO GROUP AdminGroup
Links for additional information

If you found my writing entertaining or useful and want to say thanks, you can always buy me a coffee.